

I've been working on a new project the past couple of weeks that (fortunately) requires Google Web Toolkit (GWT) and I wanted to use the new UiBinder that was released with GWT 2.0 in early December for a number of reasons (clean separation of UI and code, easier collaboration with designers, easier testing, etc ). However, I was having a hard time getting my head wrapped around it given that the GWT site has very little documentation and only a few examples. I've combed through the message boards, the docs and the sample Mail application that comes with the SDK and after finally groking the new functionality, I put together a little Hello World app, the kind that would have helped me out originally.
So I'm making some assumptions that you already have the GWT SDK and Eclipse Plugin installed and are familiar with both of them. If you are not, take a look at the GWT site for more info.
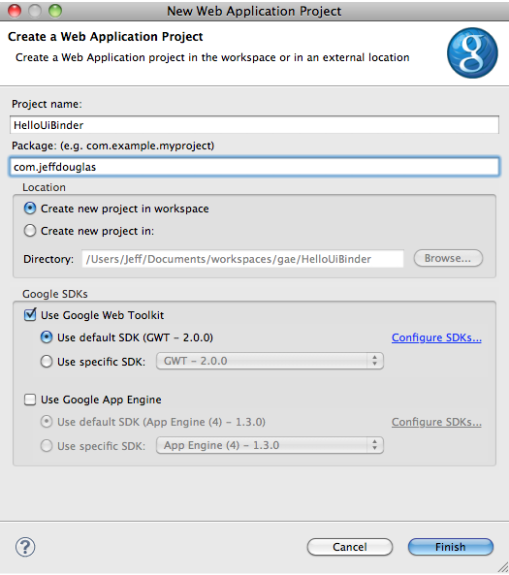
To get started, create a new Web Application Project called "HelloUiBinder" in the package of your choice but do not check "Use Google App Engine".
Now create a new UiBinder template and owner class (File -> New -> UiBinder). Choose the client package for the project and then name it MyBinderWidget. Leave all of the other defaults. When you click Finish the plugin will create a new UiBinder template and owner class.

Open the MyBinderWidget.ui.xml template and add the following code. With GWT you can define your styles either in your template where you need them or externally. I've added a small style inline that adds some pizzaz to the label. Notice the field name myPanelContent in the template. You can programmatically read and write to this field from the template's owner class. So when the owner class runs, it construct a new VerticalPanel, does something with it (probably add some type of content) and then fill this field with it.
Attributes for the elements (the text attribute in the Label element for example) correspond to a setter method for the widget. Unfortunately there is no code completion to get a list of these attributes in Eclipse when you hit the space bar so you either have to know the setters or refer to the JavaDocs each time. A painful process.
<!DOCTYPE ui:UiBinder SYSTEM "http://dl.google.com/gwt/DTD/xhtml.ent">
<ui:UiBinder xmlns:ui="urn:ui:com.google.gwt.uibinder"
 xmlns:g="urn:import:com.google.gwt.user.client.ui">
 <ui:style>
   .bolder { font-weight:bold; }
 </ui:style>
 <g:HTMLPanel>
   <g:Label styleName="{style.bolder}" text="This is my label in bold!"/>
   <g:VerticalPanel ui:field="myPanelContent" spacing="5"/>
 </g:HTMLPanel>
</ui:UiBinder>
For the owner class, MyBinderWidget.java, add the following code. In this class, a field with the same name, myPanelContent, is marked with the @UiField annotation. When uiBinder.createAndBindUi(this) is run, the content is created for the VerticalPanel and the template field is filled with the new instance.
package com.jeffdouglas.client;

import com.google.gwt.core.client.GWT;
import com.google.gwt.uibinder.client.UiBinder;
import com.google.gwt.uibinder.client.UiField;
import com.google.gwt.user.client.ui.Composite;
import com.google.gwt.user.client.ui.HTML;
import com.google.gwt.user.client.ui.VerticalPanel;
import com.google.gwt.user.client.ui.Widget;

public class MyBinderWidget extends Composite {

 private static MyBinderWidgetUiBinder uiBinder = GWT
    .create(MyBinderWidgetUiBinder.class);

 interface MyBinderWidgetUiBinder extends UiBinder<widget, MyBinderWidget> { }

 @UiField VerticalPanel myPanelContent;

 public MyBinderWidget() {
   initWidget(uiBinder.createAndBindUi(this));

   HTML html1 = new HTML();
   html1.setHTML("<a href='http://www.google.com'>Click me!</a>");
   myPanelContent.add(html1);
   HTML html2 = new HTML();
   html2.setHTML("This is my sample <b>content</b>!");
   myPanelContent.add(html2);

 }

}
Now change the entry point class to look like the following.
package com.jeffdouglas.client;

import com.google.gwt.core.client.EntryPoint;
import com.google.gwt.user.client.ui.RootPanel;

public class HelloUiBinder implements EntryPoint {

 public void onModuleLoad() {
   MyBinderWidget w = new MyBinderWidget();
   RootPanel.get().add(w);
 }
}
Now open HelloUiBinder.html and remove all of the HTML content between the </noscript> and and </body> save it. Once you run the application, copy the development URL and run paste it into your favorite supported browser, you should see the following.

Now suppose you wanted to nest a widget inside your MyBinderWidget that did something when a button was clicked. We'll create a small series of checkboxes that allows the user to select their favorite colors and display them when the button is clicked. Create a new UiBinder called FavoriteColorWidget in the client package. Add the following code to the FavoriteColorWidget.ui.xml template.
<ui:UiBinder xmlns:ui='urn:ui:com.google.gwt.uibinder'
  xmlns:g='urn:import:com.google.gwt.user.client.ui'>
  <g:VerticalPanel>
 <g:Label ui:field="greeting"/>
 <g:Label>Choose your favorite color(s):</g:Label>
 <g:CheckBox ui:field="red" formValue="red">Red</g:CheckBox>
 <g:CheckBox ui:field="white" formValue="white">White</g:CheckBox>
 <g:CheckBox ui:field="blue" formValue="blue">Blue</g:CheckBox>
 <g:Button ui:field="button">Submit</g:Button>
  </g:VerticalPanel>
</ui:UiBinder>
Now add the click handler in the FavoriteColorWidget.java owner class.
package com.jeffdouglas.client;

import java.util.ArrayList;
import com.google.gwt.core.client.GWT;
import com.google.gwt.event.dom.client.ClickEvent;
import com.google.gwt.event.dom.client.ClickHandler;
import com.google.gwt.uibinder.client.UiBinder;
import com.google.gwt.uibinder.client.UiField;
import com.google.gwt.user.client.Window;
import com.google.gwt.user.client.ui.Button;
import com.google.gwt.user.client.ui.Label;
import com.google.gwt.user.client.ui.CheckBox;
import com.google.gwt.user.client.ui.Composite;
import com.google.gwt.user.client.ui.Widget;

public class FavoriteColorWidget extends Composite {

 private static FavoriteColorWidgetUiBinder uiBinder = GWT
    .create(FavoriteColorWidgetUiBinder.class);

 interface FavoriteColorWidgetUiBinder extends
    UiBinder<widget, FavoriteColorWidget> {
 }

 @UiField Label greeting;
 @UiField CheckBox red;
 @UiField CheckBox white;
 @UiField CheckBox blue;
 @UiField Button button;

 public FavoriteColorWidget() {
   initWidget(uiBinder.createAndBindUi(this));

   // add a greeting
   greeting.setText("Hello Jeff!!");

   final ArrayList<checkBox> checkboxes = new ArrayList<checkBox>();
   checkboxes.add(red);
   checkboxes.add(white);
   checkboxes.add(blue);

   // add a button handler to show the color when clicked
   button.addClickHandler(new ClickHandler() {
    public void onClick(ClickEvent event) {
    String t = "";
    for(CheckBox box : checkboxes) {
     // if the box was checked
     if (box.getValue()) {
     t += box.getFormValue() + ", ";
     }
    }
    Window.alert("Your favorite color/colors are: "+ t);
    }
   });

 }

}
The last thing we'll need to do is add our new widget to the MyBinderWidget template. Open MyBinderWidget.ui.xml and add the custom namespace reference and the FavoriteColorWidget.
<!DOCTYPE ui:UiBinder SYSTEM "http://dl.google.com/gwt/DTD/xhtml.ent">;
<ui:UiBinder xmlns:ui="urn:ui:com.google.gwt.uibinder"
 xmlns:g="urn:import:com.google.gwt.user.client.ui"
 xmlns:c="urn:import:com.jeffdouglas.client">
 <ui:style>
   .bolder { font-weight:bold; }
 </ui:style>
 <g:HTMLPanel>
   <g:Label styleName="{style.bolder}" text="This is my label in bold!"/>
   <g:VerticalPanel ui:field="myPanelContent" spacing="5"/>
   <c:FavoriteColorWidget/>
 </g:HTMLPanel>
</ui:UiBinder>


