

With the release of the Metadata API v13 you can now interact with the Salesforce.com configuration as XML metadata files and migrate configuration changes between environments without using the SFDC UI. The metadata API contains a set of objects that manage setup and customization information (metadata) for your organizations, and the SOAP calls that manipulate those objects. With them, you can:
- Work with setup configuration as XML metadata files
- Migrate configuration changes between organizations
- Create your own tools for managing organization and application metadata
For more info on the Metadata API, see their documentation.
The use case for this project is the scenario where we are developing a rather large, complex application in a sandbox and want to migrate the configuration changes to production. To do so by hand would be extremely tedious and time-consuming. Luckily with the new API, we can migrate the configuration changes using the Force.com IDE.
Start off by creating 2 new projects in Eclipse for your target environments. In my case this is:
- DEV1 - The development sandbox org which contains all of my new projects configuration.
- QA5 - The development sandbox org which is a copy of production that I am using for testing. I am migrating the configuration to one of our QA enviroments but this could be production as well.
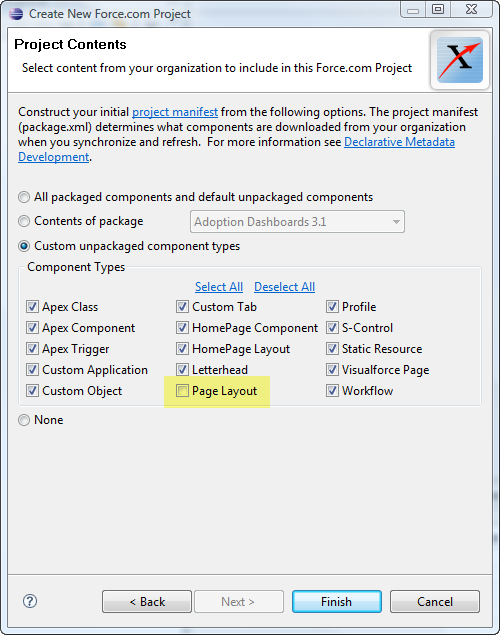
Note: When setting up your new Force.com project, you may want to uncheck the Page Layout component type as if you have a large number of page layouts this sometimes causes Eclipse to timeout when downloading the data.
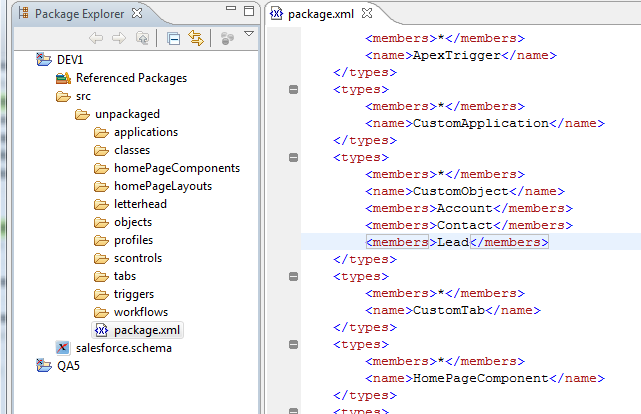
By default, your Eclipse project will only contain metadata for custom objects but with some slight tweaks to the package.xml file, you can retreive standard objects as well. Just open up src/unpackaged/package.xml and search for the element named CustomObject. Then add the standard objects that you would like to download, save the file and then right click on the objects folder and select Force.com -> Refresh from Server.
Also, for each project make sure you uncheck Build Automatically in the Project menu. When the project is set to Build Automatically, each time you save a file the changes are sent back to the server and the files are not updated properly sometimes.
Now that your two projects have been downloaded to your desktop you can use Eclipses built in compare functionality to view the difference in the two configurations. One method is to view the changes by folder. For instance, you can select the objects folder in each project (hold the control or open-apple button to select multiple), right click on one of them and select Compare With -> Each Other.
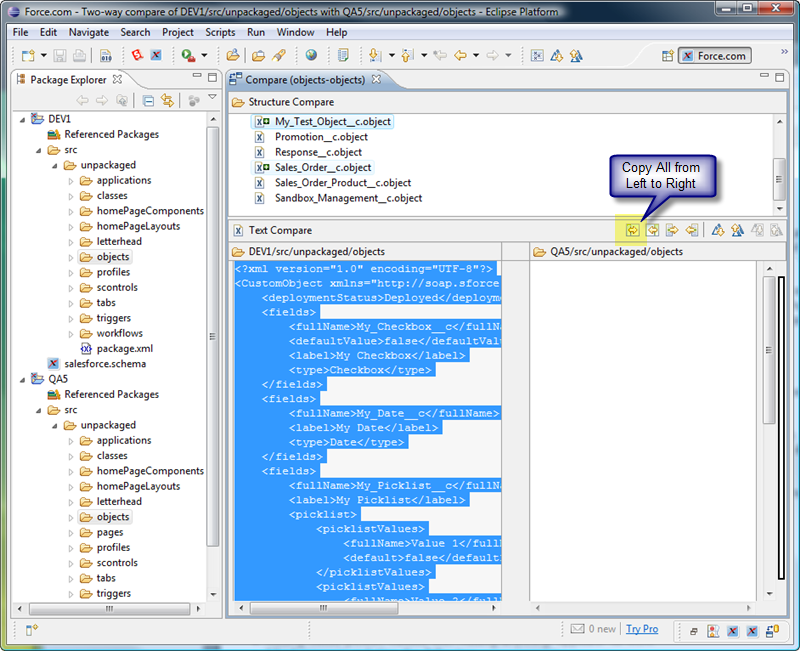
The top pane of the Compare windows displays all of the files in both directories that are different. The files with the plus signs are objects that are in DEV but not in QA. If the object existed in both DEV and QA, double clicking on the file would allow you to view the differences in the files line by line.
To migrate the new object to QA, simply select the Copy All from Left to Right and click the save button. This will create a the new file in for the object in the QA objects folder. To migrate this object to QA, simply find the new file in the QA objects folder, right click on it and select Force.com -> Save to Server.
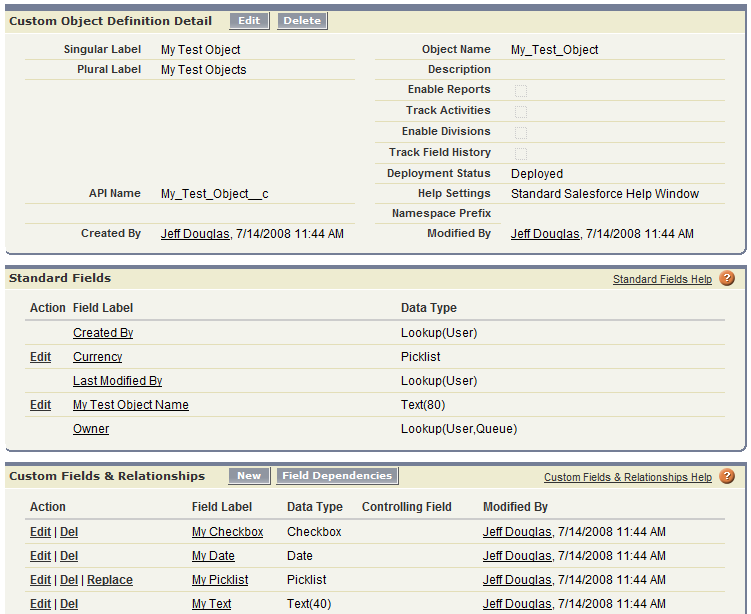
After the operation completes you should be able to log into the QA environment and see the newly created object with all of its fields, page layouts, etc. Im not sure if everything for the object will migrate over (triggers need a test case for code coverage for instance) so be sure you check. You should be able to compare the object folders again to ensure that everything migrated successfully.
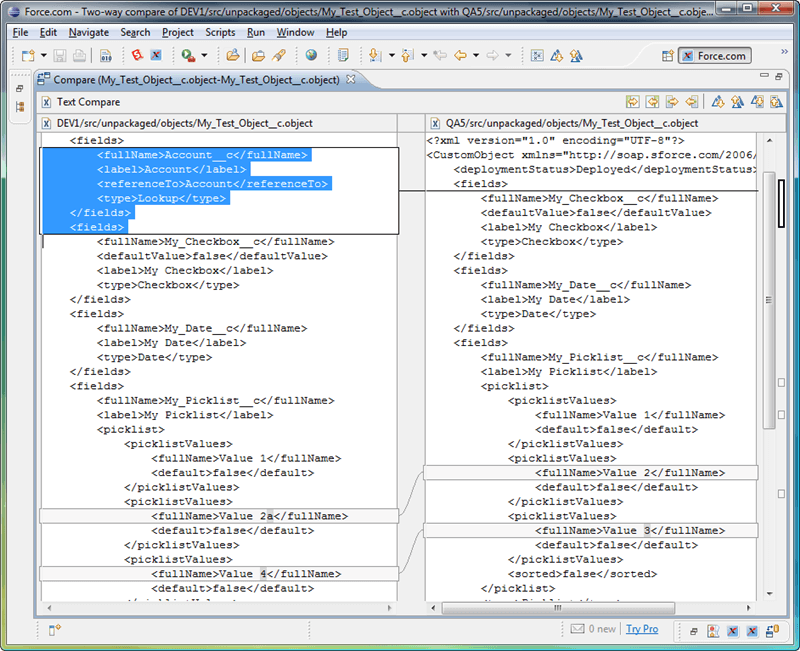
Now that the custom object exists in both environments you can update changes to the server quite easily. In this example, Ive login into Salesforce.com and added a couple of fields and made some changes to picklist values. In addition to comparing entire directories, you can also compare individual objects. Select the custom objects files in both the DEV and QA objects folder (in this cae My_Test_Object__c), right click on the file and select Compare With -> Each Other.
At this point you can work with both the DEV config and the QA config file at the same time. You make changes to the DEV config file and save it back to the server (you can right click on the individual file to save it to the server) or copy your changes over to the QA file and then save those modifications to the server. Its very flexible to migrate your configuration changes. You can make a change in DEV with the SFDC UI, refresh the file in Eclipse, compare the object, compy the changes to the QA file and then save the QA file to the server. Its that simple. or is it?
Operations that are available via Force.com and Metadata API
- Add new fields to an object
- Make minor changes such as label, field lengths, etc.
- Change the ReferenceTo (eg from Account to Contact) for a field
- Changed a field type (eg from currency to number). Logically, some conversions might not be possible?
Operations that are not available via Force.com and Metadata AP
- Cannot change the API name of an existing field. It will simply create the new field.
- Cannot delete existing picklist values
- Cannot delete fields
- Cannot change some field type (eg tried to change afield from autonumber to text but it didnt make the change).


