

Its fairly common these days to see Flex applications running inside Salesforce.com. We use Apex and Visualforce for a large majority of our custom UIs but there are some instances that just work better with Flex (drag and drop, trees, tabbed interfaces, etc.).
But what if you have a shiny, new Flex application running on your corporate website and your CEO decides he wants to display some data stored in Salesforce.com? Better yet, he wants a mashup using Salesforce.com, Google Maps, Flickr and YouTube?
As of right now you have the following options:
- Expose your Apex class as a Web service and call it from your Flex application. This is a perfectly suitable solution if you only have to make a few calls to Salesforce.com. Web service integration with Flex is not the speediest for a number of reasons.
- Utilize the Force.com Toolkit for Adobe Air and Flex providing asynchronous access to the Force.com Web services API.
- Implement a solutions using Adobes Flash Remoting technology on a variety of platforms and technologies.
- Hosting your Flex applications on Force.com Sites (when it becomes generally available this year)
- Develop a high performance data transfer service using Adobes BlazeDS open source Java remoting and messaging technology.
This tutorial will focus on the installation, configuration and development of a simple Flex application that fetches Accounts from Salesforce.com using the BlazeDS Remoting Service. The Remoting Service is a high performance data transfer service that allows your Flex application to directly invoke Java object methods on your application server (in this case Tomcat) and consume the return values natively. The objects returned from the server-side methods (primitive data types, objects, collections, etc) are automatically deserialized into either dynamic or typed ActionScript objects.
This tutorial requires that you have the following installed:
- A recent version of Tomcat (5.5+) with JDK 1.5 or higher installed
- Eclipse IDE for Java Developers (or Eclipse Classic)
- Adobe Flex 3.0 Builder 3 or Flex 3 Builder Plug-In
You will also need a Free Developer Edition of Salesforce.com. There is a link in the upper left underneath the search box on developer.force.com.
It is also assumed that you have some experience with Flex, Java and Eclipse.
Some of this information comes from a great tutorial from Christopher Coenraets called, Getting started with BlazeDS.
Demo and Code
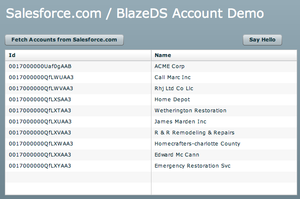
You can run the working demo of this tutorial at: http://demo.jeffdouglas.com:8080/sfdc-blazeds/sfdc-client/main.html
You can download the code for this tutorial at: http://demo.jeffdouglas.com:8080/sfdc-blazeds/sfdc-blazeds-code.zip
Install BlazeDS
You can download the latest release build of the binary distribution or the turnkey distribution (contains tomcat 6 already) from the BlazeDS download page.
Unzip the file and place the war file into your webapps directory in Tomcat. If the war doesn't automatically explode then you will need to restart Tomcat. Your WEB-INF directory should look like the following:

Create Your Java Server Project
You will need to a Java project to develop the server-side components of this tutorial. Create a new Java project in Eclipse (File -> New -> Java Project. On the next screen enter your Project name as "sfdc-blaze-server". Your screen should look like the following. After you confirm the settings, click Next.

On the next screen make sure the Default output folder is "sfdc-blaze-server/bin" and click Finish.
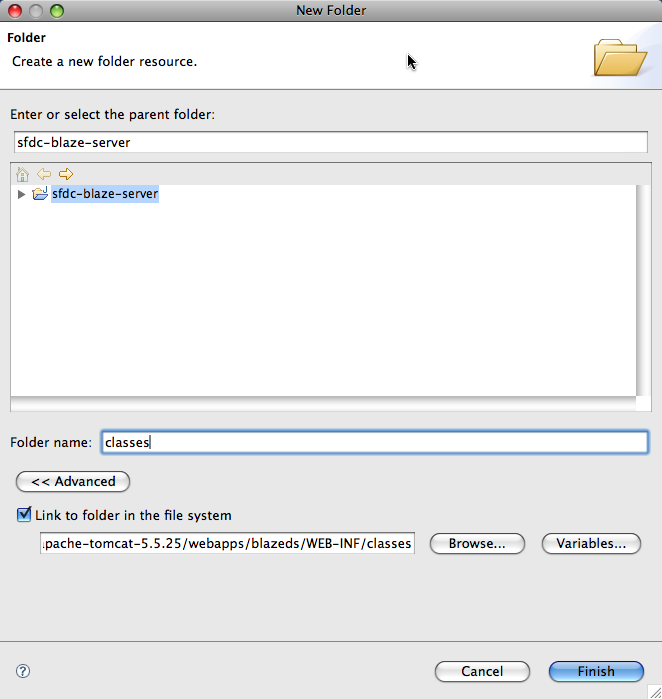
To make life a little easier well create a new folder in the project and link it to the Tomcat classes directory. Right click on your Eclipse project and select New -> Folder. Name the folder "classes", click the Advanced button and link it to the classes folder in the Tomcat application. Your screen should look like the following:
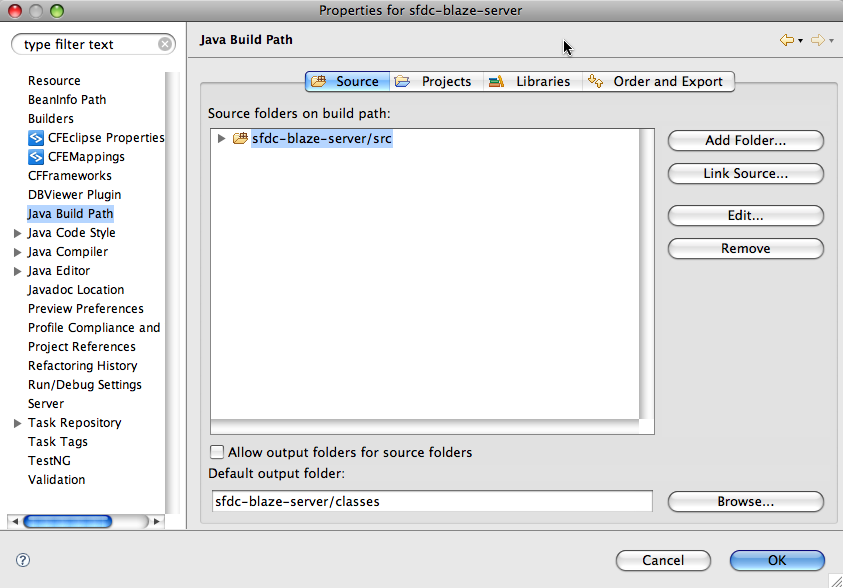
Now from the Eclipse menu, select Project -> Properties and change your Java Build Path to "sfdc-blaze-server/classes". This will compile your classes directly into your WEB-INF/classes directory for you. Your screen should look like the following:
Import the Salesforce.com WSDL
For your Java application to connect with SFDC we need to download the Salesforce.com WDSL. Log into your Developer org and go to Setup -> Develop -> API. You can download either the Enterprise or Developer WSDL but for this tutorial well use the Enterprise WDSL as it makes life a little easier. Save this file in your Eclipse project as "enterprise.wsdl".
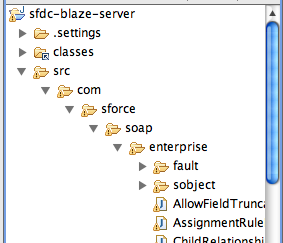
To create the Java code, right click on enterprise.wsdl and choose Web Services -> Generate Client. Select the defaults on the screen and click Finish. This runs WSDL2Java and generates the source for Salesforce.com and compiles it into your classes directory underneath Tomcat. Your Eclipse project should look like the image below:
Add Additional Jars for Web Services
For the web services integration with Salesforce.com, you will need to add the following jar files to your sfdc-blazeds/WEB-INF/lib directory in Tomcat. These jars are all contained in the code for this tutorial.
- activation.jar
- axis.jar
- commons-discovery-0.2.jar
- jaxrpc.jar
- log4j-1.2.15.jar
- mailer.jar
- saaj.jar
- wsdl4j-1.5.1.jar
Create your Java Objects
The server-side portion of this application implements a simple service layer and value object patterns:
- SfdcService the service class that provides the connection to Salesforce.com and data access logic to fetch the Accounts
- Company a simple POJO that is transferred between the server and client.
Create your Service Object
Click on File -> New -> Class, enter your package name (com.jeffdouglas.flex), class name (SfdcService) and click Finish. Add the following code for the class. Be sure to add your Salesforce.com Developer username and password (and security token if needed) into your code.
package com.jeffdouglas.flex;

import com.sforce.soap.enterprise.*;
import com.sforce.soap.enterprise.SessionHeader;
import com.sforce.soap.enterprise.SforceServiceLocator;
import com.sforce.soap.enterprise.SoapBindingStub;
import com.sforce.soap.enterprise.fault.*;
import com.sforce.soap.enterprise.sobject.*;
import java.rmi.RemoteException;
import java.util.Vector;

public class SfdcService {

 private SoapBindingStub binding;
 private LoginResult loginRes = null;

 private final String SFDC_USERNAME = "YOUR_USERNAME";
 private final String SFDC_PASSWORD = "YOUR_PASSWORD"; // may need your security token

 // fetch 10 accounts and return as a vector of Companies
 public Vector<company> getAccounts() {

  Vector<company> v = new Vector<company>();
  QueryResult qr = null;

  // log into Salesforce.com
  if (login()) {

   try {
    qr = binding.query("Select Id, Name From Account Limit 10");
    if (qr.getSize() > 0){
    for (int i=0;i<qr.getRecords().length;i++) {
     Account a = (Account)qr.getRecords(i);
     Company c = new Company();
     c.setId(a.getId());
     c.setName(a.getName());
     v.add(c);
    }
    }
   } catch (Exception e) {
    System.out.println(e.toString());
   }

  } else {
   System.out.println("Not logged into Salesforce.com");
  }

  return v;

 }

 // helper method to test the remoting
 public String sayHello() {
  return "Hello World!";
 }

 // log into Salesforce.com
 private boolean login() {
  try {

   //Provide feed back while we create the web service binding
   System.out.println("Creating the binding to the web service...");

   //Create the binding to the sforce service
   binding = (SoapBindingStub) new SforceServiceLocator().getSoap();

   //Time out after a minute
   binding.setTimeout(60000);

   try {
    //Attempt the login giving the user feedback
    System.out.println("LOGGING IN NOW....");
    loginRes = binding.login(SFDC_USERNAME, SFDC_PASSWORD);
   } catch (LoginFault ex2) {
    System.out.println("Login failure: "+ex2.getExceptionMessage());
    return false;
   } catch (RemoteException ex2) {
    System.out.println("Remote Login failure: "+ex2.getMessage());
    return false;
   }

   System.out.println("The session id is:" + loginRes.getSessionId());
   System.out.println("The new server url is:" + loginRes.getServerUrl());

   binding._setProperty(SoapBindingStub.ENDPOINT_ADDRESS_PROPERTY, loginRes.getServerUrl());
   // Create a new session header object
   SessionHeader sh = new SessionHeader();
   // add the session ID returned from the login
   sh.setSessionId(loginRes.getSessionId());
   //.Set the session header for subsequent call authentication
   binding.setHeader(new SforceServiceLocator().getServiceName().getNamespaceURI(),"SessionHeader", sh);

  } catch (Exception e) {
   System.out.println(e.getMessage());
  }
  return true;
 }

}
Create your Value Object
Create your Value Object to hold the Accounts id and name. Click on File -> New -> Class, enter your package name (com.jeffdouglas.flex), class name (Company) and click Finish. Add the following code for the class:
package com.jeffdouglas.flex;

public class Company {

 private String Id;
 private String Name;

 public String getId() {
  return Id;
 }
 public void setId(String id) {
  Id = id;
 }
 public String getName() {
  return Name;
 }
 public void setName(String name) {
  Name = name;
 }

}
Create your Remoting Destination
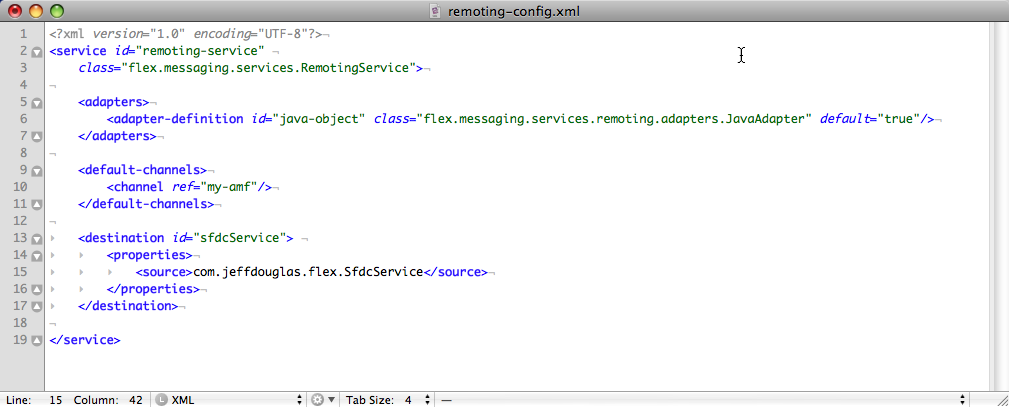
A Remoting destination exposes a Java class that your Flex application can invoke remotely. The destination id is a logical name that your Flex application uses to refer to the remote class, which eliminates the need to hardcode a reference to the fully qualified Java class name. This logical name is mapped to the Java class name as part of the destination configuration in remoting-config.xml. Open the remoting-config.xml file in your WEB-INF/flex directory and add the following destination:
<destination id="sfdcService">
<properties>
  <source>com.jeffdouglas.flex.SfdcService</source>
 </properties>
</destination>
Your remoting-config.xml file should look like:
Create your Flex Project
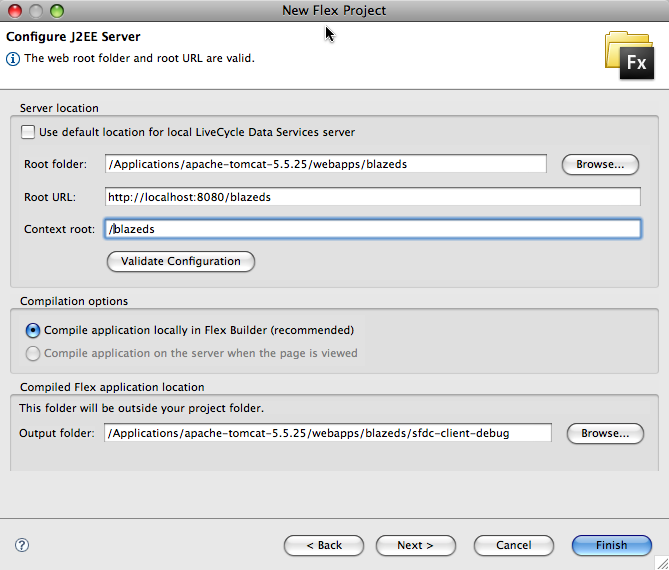
Create your Flex application by selecting File -> New -> Flex Project in the Eclipse menu. Enter sfdc-client as the project name and configure it based upon the images below. Click Next.

Make sure the root folder for LiveCycle Data Services matches the root folder of your BlazeDS web application. The settings should look similar to these:
Root Folder: /Applications/apache-tomcat-5.5.25/webapps/blazeds
Root URL: http://localhost:8080/blazeds
Context Root: /blazeds
Click Validate Configuration and then Finish. Your screen should look similar to the one below:
Once your project has been created, open main.mxml and add the following code:
<?xml version="1.0" encoding="utf-8"?>
<mx:Application xmlns:mx="http://www.adobe.com/2006/mxml"
 layout="absolute" width="600" height="400">

 <mx:RemoteObject id="sfdc"
  destination="sfdcService"
  showBusyCursor="true">
  <mx:method name="sayHello" result="helloHandler(event)" fault="faultHandler(event)" />
  <mx:method name="getAccounts" result="accountsHandler(event)" fault="faultHandler(event)" />
 </mx:RemoteObject>

 <mx:Script>
  <![CDATA[
  import mx.controls.Alert;
  import mx.collections.ArrayCollection;
  import mx.rpc.events.FaultEvent;
  import mx.rpc.events.ResultEvent;

  [Bindable]
  private var companies:ArrayCollection;

  private function helloHandler(event:ResultEvent):void {
   Alert.show(event.result.toString());
  }

  private function accountsHandler(event:ResultEvent):void {
   companies = event.result as ArrayCollection;
  }

  private function faultHandler(event:FaultEvent):void {
   Alert.show(event.fault.faultString);
  }
  ]]>
 </mx:Script>

 <mx:Label x="10" y="10" text="Salesforce.com / BlazeDS Account Demo" color="#FFFFFF" fontSize="25"/>
 <mx:Button x="10" y="70" label="Fetch Accounts from Salesforce.com" click="sfdc.getAccounts()"/>
 <mx:Button x="482" y="70" label="Say Hello" click="sfdc.sayHello()"/>
 <mx:DataGrid id="dg" dataProvider="{companies}" left="10" right="10" bottom="10" top="100">
  <mx:columns>
   <mx:DataGridColumn headerText="Id" dataField="id"/>
   <mx:DataGridColumn headerText="Name" dataField="name"/>
  </mx:columns>
 </mx:DataGrid>
</mx:Application>
Create your ActionScript Value Object
Right-click the src folder in the sfdc-client project and select New -> ActionScript Class. Enter the class name as Company and click Finish. Add the following code:
package
{
 [Bindable]
 [RemoteClass(alias="com.jeffdouglas.flex.Company")]
 public class Company
 {

  public var Id:String;
  public var Name:String;

 }
}
Notice that the code uses the [RemoteClass(alias=" com.jeffdouglas.flex.Company")] annotation to map the ActionScript version of the Company class (Company.as) to the Java version (Company.java). As a result, Company objects returned by the getAccounts() method of the service layer are deserialized into instances of the ActionScript Company classes automatically for you.
Run the Application
Now compile, run and test your application.


