

Welcome to part two of my Building with React & Flux series. Check out the Building with React & Flux: Getting Started to get up to speed on React and Flux if you are new to it.
In this post we are going to build a simple app to manage banner ads using React and RefluxJS, an implementation of Flux. My goal was to make this application as simple as possible while demonstrating the basics of React and Reflux. All of the code is available on this github repo.
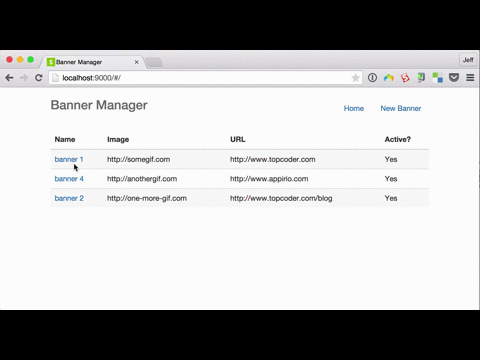
The application consists of the following views:
- The 'home page which displays a table of all banners
- A form to add a new banner
- A view that displays a banner and provides the functionality to toggle the display status of the banner
Intro to Reflux
RefluxJS is one of the many Flux implementations and I like its simplicity and use of mixins to add functionality. In general, I found Flux difficult to grok. I read the FB docs, waded through various blog posts (Flux For Stupid People and Getting to Know Flux) and even watched all of the egghead.io React and Flux videos but I honestly didnt like it. Luckily I stumbled across React.js architecture - Flux VS Reflux and it saved the day. I thought the author was reading my mind and was somehow part of the NSA. The first paragraph blew me away. While Flux seemed architecturally complex and bloated with boilerplate code, Reflux seemed streamlined and succinct. It drastically simplified the process of listening to changes in stores, made working with actions easier and less verbose and got rid of the Dispatcher entirely!! Stop now and check out the blog post for a complete comparison.
Getting Started
To run the application locally, simply clone this repo
git clone git@github.com:jeffdonthemic/hello-react-banners.gitThen install all of the dependencies for the project defined in package.json:
npm installNow you can fire the app up with the following command and then open http://localhost:9000 to run the app:
gulp watchThe application uses gulp to process and minify styles, concat JavaScript files, move processed files to a distribution directory and even start up a webserver to serve your static application file. Check out gulpfile.js for more details but essentially the only command well need is gulp watch.
Show the Code!
Lets take a look at the important files in the application. I wont cover everything but the great thing about React and Reflux is that its somewhat simple and easy to follow.
Index.html
<!DOCTYPE html>
<html lang="en">
 <head>
  <meta charset="utf-8">
  <meta http-equiv="X-UA-Compatible" content="IE=edge">
  <meta name="viewport" content="width=device-width, initial-scale=1">
  <meta name="description" content="A simple banner manager">
  <meta name="author" content="Jeff Douglas">
  <title>Banner Manager</title>
  <link rel="stylesheet" href="./styles/bootstrap.min.css">
 </head>
 <body>
  <div class="container">
 <div class="header" style="padding-bottom:25px">
  <nav>
   <ul class="nav nav-pills pull-right">
  <li role="presentation"><a href="#">Home</a></li>
  <li role="presentation"><a href="#/add">New Banner</a></li>
   </ul>
  </nav>
  <h3 class="text-muted">Banner Manager</h3>
 </div>
 <div class="row">
  <div class="col-lg-6">
   <div id="app"></div>
  </div>
 </div>
  </div>
  <script src="./scripts/app.js"></script>
 </body>
</html>
Since this is an SPA, index.html is the only page that well need. Its simply bootstrap markup with navigation, a title and a div (id=app) where React will render our application. Thats it.
App.js
/** @jsx React.DOM */
var React   = require('react');
// routing
var Router  = require('react-router');
var RouteHandler = Router.RouteHandler;
var Route   = Router.Route;
var DefaultRoute = Router.DefaultRoute;
// view components
var ViewBanner  = require('./components/view');
var AddBanner = require('./components/add');
var Banners  = require('./components/banners');

var routes = (
 <Route handler={ BannerManager }>
  <Route name="banner" path="/banner/:id" handler={ ViewBanner } />
  <Route name="add" path="/add" handler={ AddBanner } />
  <DefaultRoute name="home" handler={ Banners } />
 </Route>
);

var BannerManager = React.createClass({
 render: function() {
  return (
 <RouteHandler/>
  );
 }
});

Router.run(routes, function(Handler) {
 React.render(<Handler/>, document.getElementById('app'));
});
The app.js file sets up our application, defines the routes and renders the app. For our application well be using react-router which provides wait for it wait for it routing for our application. The routes variable defines the view hierarchy for our application. We then declare a view hierarchy with nested
The React component simply renders the Router.run, is somewhat magical. When the user selects a route, the run callback receives Handler, that has all of its appropriate information wrapped up in it. If our app would be managing some type of state, we could pass this state down the view hierarchy. For our use case, we simply use the standard boilerplate and render our application into the app div.
BannerStore.js
/** @jsx React.DOM */
var Reflux = require('reflux');
var _ = require('lodash');
var actions = require('../actions/actions');

var _banners = [];

var defaultBanners = function() {
 return [
  {"id": 1, "name": "banner 1", "imageUrl": "http://somegif.com", "targetUrl": "http://www.topcoder.com", "active": "Yes"},
  {"id": 2, "name": "banner 4", "imageUrl": "http://anothergif.com", "targetUrl": "http://www.appirio.com", "active": "Yes"},
  {"id": 3, "name": "banner 2", "imageUrl": "http://one-more-gif.com", "targetUrl": "http://www.topcoder.com/blog", "active": "Yes"}
 ]
}

var bannersStore = Reflux.createStore({

 init: function() {
  // set the private banners variables to our initial array
  _banners = defaultBanners();
  // register addBanner action & bind to addBanner function
  this.listenTo(actions.addBanner, this.addBanner);
  // register toggleStatus action & bind to togggle function
  this.listenTo(actions.toggleStatus, this.toggle);
 },

 // returns the private array of banners
 getBanners: function() {
  return _banners
 },

 // returns a banner by id
 getBanner: function(bannerId) {
  return _.where(_banners, { 'id': bannerId })[0];
 },

 // pushes the newly created banner to the private array of banners
 addBanner: function(banner) {
  _banners.push(banner);
 },

 // callback for toggle action
 toggle: function(bannerId) {
  var banner = _.where(_banners, { 'id': bannerId })[0];
  // toggle the banner status in the obect
  banner.active = banner.active === 'Yes' ? 'No' : 'Yes';
  // pass the data on to any listeners -- see toggleStatus in view.js)
  this.trigger();
 }

});

module.exports = bannersStore;
The heart of the application is the Reflux store which holds all of the model and business logic. The store holds private array of banners, _banners, which the users interact with. In our init function, this array is populated by the defaultBanners function. Were using a simple array of banner objects but this is where youd typically fetch your data from some API. We also register some actions (toggleStatus and addBanner) that the store listens for and binds them to individual function that handle the appropriate logic.
We also have a couple of getter methods that returns the array of private banners and a specific banner by its ID.
The addBanner function is called whenever the store hears an addBanner action. It pushes the new banner received to the private array of banners and updates the DOM to display the new row in the home page table.
The toggle function is called whenever the store hears a toggleStatus action. This function find the appropriate banner in the private array by its ID and then toggles its active property. The trigger method passes the change notification to any listeners to update the DOM.
Actions.js
/** @jsx React.DOM */
var Reflux = require('reflux');

var actions = Reflux.createActions({
  'toggleStatus': {},
  'addBanner': {}
});

module.exports = actions;
The action.js file uses Reflux is much smaller and simpler than the standard Flux Dispatcher. It simply defines the actions that our app will broadcast. Not much to see here.
Banners.js
/** @jsx React.DOM */
var React = require('react');
var Reflux = require('reflux');
var BannersStore = require('../stores/bannersStore');

var Link = require('react-router').Link;

function getBanners() {
 return { banners: BannersStore.getBanners() }
}

var Banners = React.createClass({

 getInitialState: function() {
  return getBanners();
 },

 render: function() {

  var rows = this.state.banners.map(function(banner, i) {
 return (
  <tr key={i}>
   <td><Link to="banner" params=>{banner.name}</Link></td>
   <td>{banner.imageUrl}</td>
   <td>{banner.targetUrl}</td>
   <td>{banner.active}</td>
  </tr>
 )
  });

  return (
 <div>
  <table className="table table-striped">
   <thead>
  <tr>
   <th>Name</th>
   <th>Image</th>
   <th>URL</th>
   <th>Active?</th>
  </tr>
   </thead>
   <tbody>
  { rows }
   </tbody>
  </table>
 </div>
  )
 }

});

module.exports = Banners;
This view component is responsible for displaying our table of banner data. When initialized, the getInitialState method is called and loads the banner data from the store into the state. When the component renders, it first creates a variable of rows that is used to display the actual data in the table rows.
View.js
/** @jsx React.DOM */
var React = require('react');
var Router = require('react-router');
var Reflux = require('reflux');
var BannersStore = require('../stores/bannersStore');
var actions = require('../actions/actions');

var Display = React.createClass({

 mixins: [
  Router.Navigation,
  Router.State,
  Reflux.ListenerMixin
 ],

 componentDidMount: function() {
  this.listenTo(BannersStore, this.toggleStatus);
 },

 getInitialState: function() {
  var bannerId = parseInt(this.getParams().id);
  return {
 banner: BannersStore.getBanner(bannerId)
  }
 },

 toggleStatus: function() {
  this.setState({
  banner: BannersStore.getBanner(parseInt(this.getParams().id))
  });
 },

 render: function() {
  return (
 <div>
  <dl className="dl-horizontal">
   <dt>Name</dt>
   <dd>{this.state.banner.name}</dd>
   <dt>Image</dt>
   <dd>{this.state.banner.imageUrl}</dd>
   <dt>Target URL</dt>
   <dd>{this.state.banner.targetUrl}</dd>
   <dt>Active?</dt>
   <dd>{this.state.banner.active}</dd>
  </dl>
  <div className="col-sm-offset-2">
   <button type="button" className="btn btn-primary" onClick={ actions.toggleStatus.bind(this, this.state.banner.id) }>Toggle Active</button>
  </div>
 </div>
  );
 }

});

module.exports = Display;
The view.js file is pretty interesting and has a lot going on. First, the class uses an array of mixins to add functionality to the component. When the component initially mounts, is uses Refluxs ListenerMixin to listen for changes in the BannerStore and act accordingly. The getInitialState method grabs the ID of the banner being viewed and calls the BannerStores getBanner method and adds it to the state. When the component renders, it displays this state data on the page.
There is also a 'Toggle Active button that, when clicked, broadcasts actions.toggleStatus and passes the ID of the banner. The BannerStore is responsible for toggling the Yes/No status of the banner and then notifies any listeners that there has been a change. This view component listens for any change to the BannerStore and then calls toggleStatus to change the state and update the DOM.
Add.js
/** @jsx React.DOM */
var React = require('react');
var Router = require('react-router');
var _ = require('lodash');
var BannersStore = require('../stores/bannersStore');

var AddForm = React.createClass({

 mixins: [
  require('react-router').Navigation, // needed for transitionto
 ],

 getInitialState: function() {
  return {
 banner: {
  id: Math.floor((Math.random() * 10000) + 1),
  name: '',
  imageUrl: 'http://yet-anothergif.com',
  targetUrl: 'http://www.topcoder.com',
  active: 'Yes'
 },
 errors: {}
  }
 },

 renderTextInput: function(id, label, help) {
  return this.renderField(id, label, help,
 <input type="text" className="form-control" id={id} ref={id} key={id} value={this.state.banner[id]} onChange={this.handleChange.bind(this, id)}/>
  )
 },

 renderField: function(id, label, help, field) {
  return <div className={$c('form-group', {'has-error': id in this.state.errors})}>
 <label htmlFor={id} className="col-sm-2 control-label">{label}</label>
 <div className="col-sm-6">
  {field} <span className="help-block m-b-none">{help}</span>
 </div>
  </div>
 },

 // update the state when they type stuff a the text box
 handleChange: function(field, e) {
  var thisBanner = this.state.banner;
  thisBanner[field] = e.target.value;
  this.setState({banner: thisBanner});
 },

 handleSubmit: function(e) {
  e.preventDefault();
  var errors = {}
  var required = ['name', 'imageUrl', 'targetUrl'];
  // check for required fields
  required.forEach(function(field) {
 if (!this.state.banner[field]) {
  errors[field] = 'This field is required.'
 }
  }.bind(this));
  // update the state with any errors
  this.setState({errors: errors});
  // if no errors, emit action to add it
  if (_.keys(errors).length === 0) {
 BannersStore.addBanner(this.state.banner);
 // refresh the form and errors
 this.setState({
  banner: {},
  errors: {}
 });
 this.transitionTo('home');
  }
 },

 render: function() {

  return (
 <div>
  <div className="row">
   <div className="col-lg-8">
  <div className="ibox float-e-margins">
   <div className="ibox-content">

    <form onSubmit={ this.handleSubmit } className="form-horizontal">
   {this.renderTextInput('name', 'Name', '')}
   {this.renderTextInput('imageUrl', 'Image URL', '')}
   {this.renderTextInput('targetUrl', 'Target URL', 'The URL to the person is taken to when clicking.')}
   <div className="form-group">
     <div className="col-sm-4 col-sm-offset-2">
     <button className="btn btn-primary" type="submit">Add Banner</button>
     </div>
   </div>

    </form>
   </div>
  </div>
   </div>
  </div>
 </div>
  )

 }

});

module.exports = AddForm;

function $c(staticClassName, conditionalClassNames) {
 var classNames = []
 if (typeof conditionalClassNames == 'undefined') {
  conditionalClassNames = staticClassName
 }
 else {
  classNames.push(staticClassName)
 }
 for (var className in conditionalClassNames) {
  if (!!conditionalClassNames[className]) {
 classNames.push(className)
  }
 }
 return classNames.join(' ')
}
Our final component displays a form for entering a new banner. IMHO I takes more work that I think it should. I tried to implement a couple of libraries such as react-froms and react-bootstrap but had much better luck rolling my own for this simple application.
When the component initializes, getInitialState sets up the state with default error and banner objects. The errors object be will used to notify the user that a field is required when submitting while the banner object will default in some data to the form fields.
When the component renders it calls renderTextInput for each of the three form fields. This adds the appropriate HTML to the DOM to make the field look pretty and sets up any error notifications when the form is submitted. The value of the form field is bound to the banner in the state and fires the handleChange event whenever the user changes the text (i.e., typing). The handleChange function updates the state which re-renders the DOM node for the form field.
When the user clicks the submit button, the forms onSubmit handler calls the handleSubmit function which check to make sure all fields are filled out. If a required field is blank, it adds this to the states error object which display the field in a red box. If everything is filled out correctly, it calls the BannerStores addBanner method with the new banner data, resets the components state and display the home page which show the newly added banner in the table.
Conclusion
So there you have it, a minimal React and Reflux application that you can use as a starter for your own project. Next week well start building a Node API for our application.


